
Support
Parts
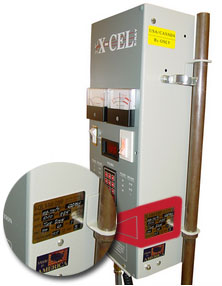
In order to service your parts request, please provide the serial and model numbers, on the control box. To locate these numbers, see the illustration.
Service
X-Cel technicians are always available to evaluate a problem and provide you with expert advice and efficient service support. We offer both in-warranty and out-of-warranty service. X-Cel takes pride in providing service for all its own units.
Field Service
To have your unit serviced onsite, Contact your Authorized Dealer or call X-Cel X-Ray at
800-441-2470
Radiation Issues
When asked, are the X-CEL X-RAY model 700 series and 900 series safe?
We answer yes.
1. A typical extremity exposure produces 25 to 30 mr.2. Generally, it has not been required to use lead on walls or doors. As the years pass, it has become a trend to consider lead in the walls of new construction. Some states, like
Michigan, require lead in the walls for all x-ray. The final answer will come from your state radiation inspector. (For state radiation inspection, an estimate of the number of exposures per week will be required).
3. All of the X-CEL X-RAY units are manufactured in Crystal Lake, Illinois, USA, under the government's GMP Program and are certified by X-CEL X-RAY CORPORATION to meet or exceed the Federal Government's requirements under performance standard number 1020.31. To insure this, the government randomly selects x-ray units for testing on site or one is selected from inventory for their laboratory.
4. As with any tool, proper installation and use will further insure safety to patient and operator. By following some simple procedures, you will be complimented by every inspector and operator.
Electrical Requirements for Podiatry and Orthopaedic X-Ray Systems
- Minimum 20.0 amp GFCI protected circuit is recommended
- Long-term current draw is less than 3.0 amps
- Momentary current draw is up to 20.0 amps
For lead requirements please contact your local
radiation physicist or state inspector.
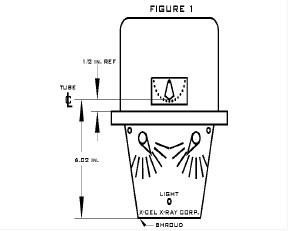
BEAM LIMITING DEVICE (BLD)
The front panel of the adjustable collimator includes graduation to allow pre-determining the x-ray field size for the SID indicated. To use BLD, rotate the knobs on the front panel to the desired film size and SID (Distance) Pointer (knobs) should point to small punch mark when blades are closed completely.
Depress the light switch, (front center) and the light will operate for a short period of time. The lighted area represents the radiation field within 2% of the SID
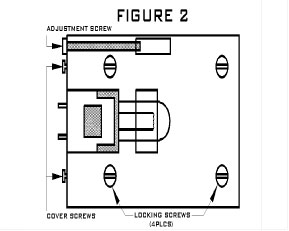
LAMP CHANGING INSTRUCTIONS – Fig 2
Unplug x-ray unit from wall outlet. To remove the shroud (fig 1), rotate x-ray head toward ceiling, loosen screws on the right and left sides of the collimator adjustments, and remove lamp cover. Remove bulb by using the tip of a small screwdriver to lift bulb out. Use X-Cel part number #805086. CAUTION: Do Not Touch Glass With Your Fingers.
To Adjust Lamp - Fig 2
To align the light field, loosen the 4 Locking Screws. To move field sideways, rotate the Adjustment Screw. When adjustment is finished, tighten Locking Screws.
Light field and radiation field size will be correct when the lamp filament is centered over the collimator box frame.
Depress the light switch, (front center) and the light will operate for a short period of time. The lighted area represents the radiation field within 2% of the SID
LAMP CHANGING INSTRUCTIONS – Fig 2
Unplug x-ray unit from wall outlet. To remove the shroud (fig 1), rotate x-ray head toward ceiling, loosen screws on the right and left sides of the collimator adjustments, and remove lamp cover. Remove bulb by using the tip of a small screwdriver to lift bulb out. Use X-Cel part number #805086. CAUTION: Do Not Touch Glass With Your Fingers.
To Adjust Lamp - Fig 2
To align the light field, loosen the 4 Locking Screws. To move field sideways, rotate the Adjustment Screw. When adjustment is finished, tighten Locking Screws.
Light field and radiation field size will be correct when the lamp filament is centered over the collimator box frame.
GETTING THE PERFECT X-RAY IMAGE FOR X-RAY FILM
Experience has shown that you must do all that is recommended in this process, which takes about thirty minutes. The best way to do it is to read the instructions carefully, then visualize every step of the way, so that you're clear on what you're doing and you will remember it. At the end of it all, you want to be able to say, "I'm, proud of the film that I have, and I'll be proud to send it for a second opinion."
For problems of what people usually refer to as films that are light, films that lack definition, or films that are dark, the reasons may vary, but the corrective process is the same.
You have to confirm that the darkroom is perfect, and you first do that by turning on all the outside lights adjacent to the darkroom, the office, especially the doctor's office, or any room that normally would not be used, or occasionally used. With those lights on, you go (do not delegate this job) into the darkroom, turn the safe light off, and plan to be in the darkroom for about ten minutes. That's what it takes for your eyes to adjust. At the end of ten minutes you either will see light and be able to see your hand on the end of your arm, or... you won't be able to see your hand. Once you've reached ten minutes, your eyes will have adjusted to the dark, and if the room is actually dark, it'll be kind of an eerie feeling, where you know your hand is on the end of your arm, but you can't see it. This is very important, and it's also important to continue to have the safe light off even for three or four days after you get what you feel is a perfect film.
Sources of light are false ceilings with light fixtures that leak light from other rooms, even a nail hole in the wall can cause problems.
Then, when you turn the safe light on, it could cause trouble with the film again, and that would be because the source light is either too close to the film, or the filter's got a crack in it, or it's incompatible with the film that you're using. Add high wattage bulbs to that list of causes.
Once you have that set, it's time to look at the processing machine or dip tank. There you need fresh chemistry. And I would guess that anything over a week should be changed because when you go to adjust the machine without fresh chemistry, you can get some inherent errors that you won't be able to explain later. So, change your chemistry like you normally would and make sure it's fresh... then go to the x-ray machine.
A problem with some automatic processors is that the upper tray through which the film must travel, is small and the chemistry can deplete it's potency within a week. Another way to say this is, if you have a one (1) day a week office, you may have to change the upper tray to solve the "light film" problem.
At the x-ray machine, to find out what would be a good setting for a film, I suggest you set the x-ray machine at 50 kVp. The mA at 10 and the time we want to set at four different stages.
So if you take a regular film and set it up so that you can block out three-quarters of it and do this four times, you'll end up with four squares of the film you're going to expose, you'll expose it at different times; and they would be approximately 1/4 of a second, which would be (015) 15/60; ½ second, that would be (030) 30/60. When you're finished with that film, you develop it in the new chemistry and take it to your view box. There, you want to get your finger behind the film to see which one of the squares is dark enough so that when you put your finger behind the film over a lighted view box, that you can just barely tell that your finger is moving. When you get that square, you know how much time it is. I'm going to take, for conversation example, that it was the (030) 30/60 time, then that would be a perfect time to set the machine for a D/P view. You should set it at 50 kVp, 10 mA, if (030) 30/60 was right, you'd set it for (030) 30/60. This might be longer than what you're used to taking, but it still will give you a good film, you'll get good definition, the toes would be nice and light and you'll get soft tissue effect. At this time try D/P exposures at 52 and 55 kVp for a comparison. Chose the best D/P then continue to make a lateral view.
For a lateral, all you have to do is increase the kVp about 7 to 10 kVp, it's best to have the patient stand on a piece of felt, about 1/4" or more, which will allow you to project the soft tissue below the metatarsals. Once you get those two views done, you can look at them and decide if you want a little darker or lighter, but you'll end up with an excellent film and this precludes having to know what kind of film you have, or what cassette and what screens. Correct your technique chart and post it. Notice that the technique calls for changing the kVp (penetrating power) not the time as the object part thickness changes.
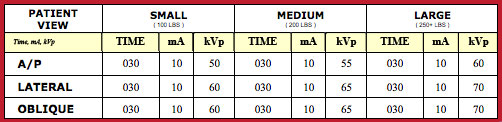
In summary, remember you are certifying the darkroom "dark", the processing chemicals "fresh" and that you have two screens in each cassette before making exposures. This will make the X-CEL X-RAY machine perform as it was designed. Remember to make a new and detailed technique chart to post near the x-ray machine control. The chart should provide for small, medium and large patients as well as the views you will be using.
For problems of what people usually refer to as films that are light, films that lack definition, or films that are dark, the reasons may vary, but the corrective process is the same.
You have to confirm that the darkroom is perfect, and you first do that by turning on all the outside lights adjacent to the darkroom, the office, especially the doctor's office, or any room that normally would not be used, or occasionally used. With those lights on, you go (do not delegate this job) into the darkroom, turn the safe light off, and plan to be in the darkroom for about ten minutes. That's what it takes for your eyes to adjust. At the end of ten minutes you either will see light and be able to see your hand on the end of your arm, or... you won't be able to see your hand. Once you've reached ten minutes, your eyes will have adjusted to the dark, and if the room is actually dark, it'll be kind of an eerie feeling, where you know your hand is on the end of your arm, but you can't see it. This is very important, and it's also important to continue to have the safe light off even for three or four days after you get what you feel is a perfect film.
Sources of light are false ceilings with light fixtures that leak light from other rooms, even a nail hole in the wall can cause problems.
Then, when you turn the safe light on, it could cause trouble with the film again, and that would be because the source light is either too close to the film, or the filter's got a crack in it, or it's incompatible with the film that you're using. Add high wattage bulbs to that list of causes.
Once you have that set, it's time to look at the processing machine or dip tank. There you need fresh chemistry. And I would guess that anything over a week should be changed because when you go to adjust the machine without fresh chemistry, you can get some inherent errors that you won't be able to explain later. So, change your chemistry like you normally would and make sure it's fresh... then go to the x-ray machine.
A problem with some automatic processors is that the upper tray through which the film must travel, is small and the chemistry can deplete it's potency within a week. Another way to say this is, if you have a one (1) day a week office, you may have to change the upper tray to solve the "light film" problem.
At the x-ray machine, to find out what would be a good setting for a film, I suggest you set the x-ray machine at 50 kVp. The mA at 10 and the time we want to set at four different stages.
So if you take a regular film and set it up so that you can block out three-quarters of it and do this four times, you'll end up with four squares of the film you're going to expose, you'll expose it at different times; and they would be approximately 1/4 of a second, which would be (015) 15/60; ½ second, that would be (030) 30/60. When you're finished with that film, you develop it in the new chemistry and take it to your view box. There, you want to get your finger behind the film to see which one of the squares is dark enough so that when you put your finger behind the film over a lighted view box, that you can just barely tell that your finger is moving. When you get that square, you know how much time it is. I'm going to take, for conversation example, that it was the (030) 30/60 time, then that would be a perfect time to set the machine for a D/P view. You should set it at 50 kVp, 10 mA, if (030) 30/60 was right, you'd set it for (030) 30/60. This might be longer than what you're used to taking, but it still will give you a good film, you'll get good definition, the toes would be nice and light and you'll get soft tissue effect. At this time try D/P exposures at 52 and 55 kVp for a comparison. Chose the best D/P then continue to make a lateral view.
For a lateral, all you have to do is increase the kVp about 7 to 10 kVp, it's best to have the patient stand on a piece of felt, about 1/4" or more, which will allow you to project the soft tissue below the metatarsals. Once you get those two views done, you can look at them and decide if you want a little darker or lighter, but you'll end up with an excellent film and this precludes having to know what kind of film you have, or what cassette and what screens. Correct your technique chart and post it. Notice that the technique calls for changing the kVp (penetrating power) not the time as the object part thickness changes.
In summary, remember you are certifying the darkroom "dark", the processing chemicals "fresh" and that you have two screens in each cassette before making exposures. This will make the X-CEL X-RAY machine perform as it was designed. Remember to make a new and detailed technique chart to post near the x-ray machine control. The chart should provide for small, medium and large patients as well as the views you will be using.
| File | Description | File size |
|---|---|---|
| 339 kB | ||
| 156 kB | ||
| 416 kB | ||
| 1106 kB | ||
| 1222 kB | ||
| 221 kB | ||
| 226 kB | ||
| 256 kB | ||
| 91 kB | ||
| 157 kB | ||
| 242 kB | ||
| 922 kB |